Quick Answer: Brown water during Monstera cutting propagation is most often caused by harmless tannins and natural root secretions — think of it like brewing a weak cup of tea. Light amber discoloration is completely normal. Dark brown or black water with a foul smell, however, signals bacterial growth or rot and needs immediate attention.
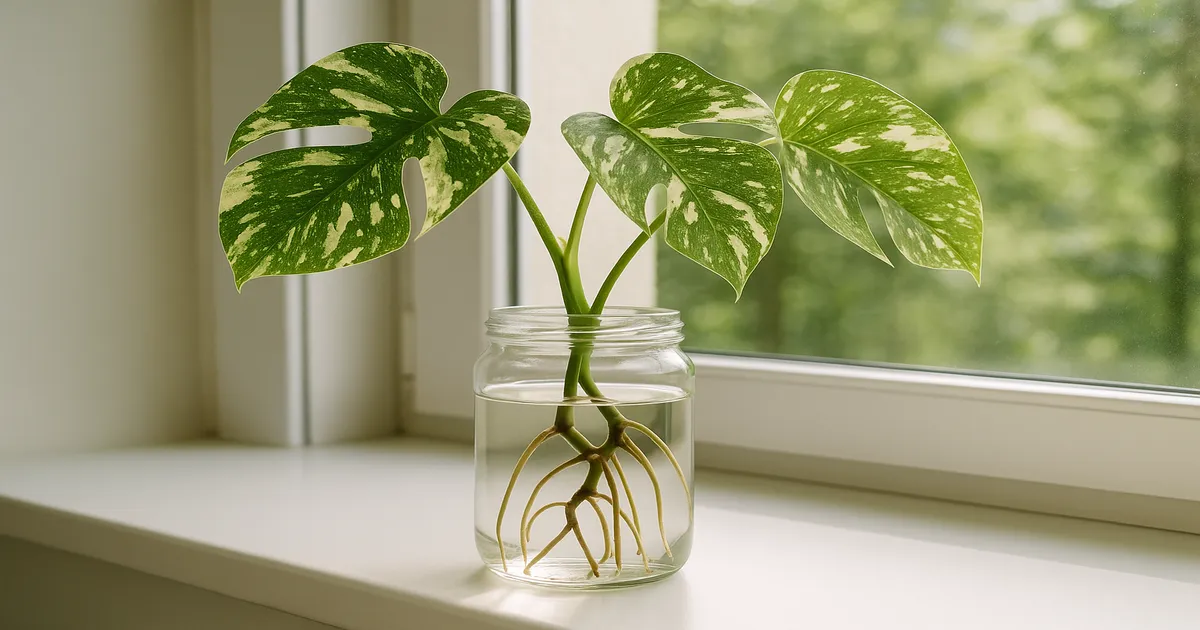
If you’ve ever dropped a Monstera cutting into a glass of water and watched it slowly turn the color of cold coffee, you’re not alone. “Why is the water brown for Monstera cutting?” is one of the most common questions new propagators ask — and the answer depends entirely on what shade of brown you’re looking at. This guide walks you through every possible cause, from completely harmless to genuinely urgent, so you can diagnose and fix the problem fast.
Is Brown Water Normal During Monstera Water Propagation?
How Monstera Roots Naturally Discolor Water
Monstera roots are adventitious — they emerge from nodes rather than a central root system — and they’re naturally fleshy and mucilaginous. As they develop, they release organic compounds into the surrounding water: tannins, polysaccharides, and phenolic byproducts of normal cell division. The result looks a lot like brewing tea. These compounds are water-soluble, brown, and completely harmless to your cutting.
Variegated cultivars like Thai Constellation and Monstera deliciosa ‘Albo Variegata’ tend to discolor water faster than standard M. deliciosa. Their cell walls contain higher concentrations of phenolic compounds, so don’t be alarmed if your variegated cutting browns the water more quickly than expected.
Light Amber vs. Dark Brown vs. Black: What Each Color Means
| Color | Likely Cause | Action Needed? |
|---|---|---|
| Light amber / tea-colored | Natural tannins and root exudates | No — normal |
| Cloudy / murky | Bacterial biofilm | Yes — clean and change water |
| Rusty brown, no odor | Diatom algae | Yes — switch to opaque vessel |
| Dark brown / black + odor | Rot | Yes — act immediately |
Smell is your most reliable early warning system. Clear amber water that smells like nothing is fine. Water that smells sulfurous or rotten is not — act quickly regardless of color.
8 Reasons Your Monstera Cutting Water Turns Brown
1. Natural Tannins and Root Mucilage (Most Common)
This is behind the majority of brown-water complaints. As Monstera roots grow, they secrete tannins and mucilaginous polysaccharides — the same class of compounds that make black tea brown. The water turns a clear amber with no odor and no sliminess. Severity: Harmless. Regular water changes are all you need.
2. Bacterial Biofilm and Microbial Growth
Stagnant, nutrient-rich water is a perfect breeding ground for bacteria. The organic compounds your cutting releases serve as a food source, and a biofilm quickly forms on roots and container walls. The water turns cloudy rather than a clear amber, and there’s often a faint sulfurous smell. Bacterial growth accelerates sharply above 75°F (24°C), so warm summer rooms are especially high-risk. Severity: Monitor closely; act if any odor develops.
3. Rotting Stem or Submerged Leaf Tissue (Most Dangerous)
Decomposing plant tissue releases hydrogen sulfide, organic acids, and dark pigments. The water turns dark brown to black, the smell is unmistakably foul, and the stem at or below the waterline will feel soft and mushy. Any submerged leaf material rots rapidly and accelerates the whole process. Severity: Act immediately — rot can spread to healthy tissue within days.
4. Brown Algae and Diatom Growth
When a clear glass vessel sits near a bright window, diatoms — microscopic algae containing the pigment fucoxanthin rather than chlorophyll — colonize the water and produce a rusty-brown tint. Unlike bacterial biofilm, there’s no odor. You may notice a slippery film on the inside of the glass, and the color has a slightly orange-rust quality. Severity: Harmless to the cutting, but worth fixing to keep conditions clean.
5. Soil and Organic Debris Left on the Cutting
If your cutting came from a soil-grown plant and wasn’t thoroughly rinsed, residual peat, bark, or perlite dust will cloud and brown the water almost immediately — within minutes of placing the cutting. Humic and fulvic acids from the soil dissolve quickly and are naturally dark. Severity: Harmless if addressed quickly; rinse the cutting and start with fresh water.
6. Tap Water Minerals and Iron Oxidation
Tap water from older plumbing or well sources can contain elevated iron. When ferrous iron (Fe²⁺) oxidizes to ferric iron (Fe³⁺), it produces a rust-orange precipitate. You may also notice mineral deposits forming on the inside of the glass. There’s no odor, and the tint is more orange than brown. Hard tap water above 180 ppm total dissolved solids can accelerate this. Severity: Harmless to humans, but poor water quality can stress sensitive cuttings.
7. Fertilizer and Additive Discoloration
Humic acid, fulvic acid, liquid seaweed, and kelp extracts are all naturally dark brown to black. If you’ve added any of these to your propagation water, they’re almost certainly the cause. The color appears immediately and is consistent throughout the water. Severity: Harmless at correct dilutions — though these additives are generally unnecessary during early water propagation.
8. Phenolic Oxidation at the Fresh Cut Surface
A fresh Monstera stem cut releases phenolic compounds — chlorogenic acid, caffeic acid, and related polyphenols — from damaged cells. Oxygen triggers an enzymatic browning reaction (the same one that browns a cut apple), producing dark quinones that leach into the water. This is most pronounced in the first 24–72 hours and more intense in variegated cultivars. Severity: Harmless. A water change within the first 24 hours resolves it.
How to Fix Brown Monstera Propagation Water
Fixing Tannin Discoloration: Activated Charcoal and Water Changes
The simplest fix is also the most effective. Change the water every 3–5 days and add 1–2 pieces of horticultural activated charcoal to the vessel. Activated charcoal adsorbs tannins and phenolic compounds, noticeably slowing discoloration between changes. Light amber water with no smell needs no other intervention.
Treating Bacterial Biofilm: Hydrogen Peroxide Rinse Method
- Remove the cutting and set it aside in a small amount of fresh water.
- Empty the vessel and scrub the inside with a 3% hydrogen peroxide solution (standard drugstore strength).
- Rinse thoroughly with clean water.
- Trim any brown, dead, or slimy root tissue with sterile scissors.
- Refill with fresh filtered or distilled water and return the cutting.
- Increase water changes to every 2–3 days until the biofilm clears.
Saving a Rotting Monstera Cutting Step by Step
- Remove the cutting from water immediately.
- Examine the stem — healthy tissue is firm and white or pale green inside; rotted tissue is brown, mushy, and smells bad.
- Using a sharp blade sterilized with 70% isopropyl alcohol, cut back the stem until you reach healthy tissue.
- Let the new cut end air-dry for 2–4 hours.
- Dust the cut surface lightly with powdered cinnamon or horticultural sulfur powder — both have antifungal properties.
- Return to a freshly cleaned vessel with new water, ensuring no leaf material is submerged.
If rot has reached the node itself, the cutting is unlikely to recover.
Eliminating Algae: Switch to an Opaque Vessel
Block the light. Switch to a dark or opaque vessel, or wrap your glass jar in dark paper or fabric. If you want to monitor root growth, briefly transfer the cutting to a clear container for inspection, then return it. Scrub the vessel with dilute hydrogen peroxide to remove any existing biofilm before switching.
Improving Your Water Quality
Distilled water, reverse osmosis (RO) water, or collected rainwater are all ideal — they start with near-zero dissolved solids and eliminate mineral and chloramine issues. If you use tap water, check it with an inexpensive TDS meter and aim for under 100 ppm. Letting tap water sit uncovered for 24 hours off-gasses chlorine, but it won’t remove chloramine — for that, use a carbon-block filter or switch to filtered water.
Prevention: Keeping Monstera Propagation Water Clear
Choosing the Right Vessel and Water
Start with an opaque or dark-colored vessel to block algae-fueling light. Wide-mouthed containers allow better gas exchange and are easier to clean. Always begin with filtered, distilled, or rainwater, and sterilize the vessel with dilute hydrogen peroxide before first use.
Preparing Your Cutting Correctly
- Use a sharp, sterile blade — clean cuts minimize cell damage and phenolic release.
- Remove every leaf that falls below the waterline. Submerged leaves rot.
- Let the cut end air-dry for 1–2 hours before placing in water.
- Perform the first water change within 24 hours to flush initial phenolic oxidation products.
Water Change Schedule by Season
- Summer: every 2–3 days — warm temperatures accelerate bacterial growth
- Spring and Autumn: every 3–5 days
- Winter: every 5–7 days — cooler temperatures keep water cleaner longer
Clean the vessel itself with dilute hydrogen peroxide every 1–2 weeks, not just at water changes.
Ideal Conditions for Monstera Water Propagation
The sweet spot for water propagation is 65–75°F (18–24°C). Below this range, root development slows significantly. Above 75°F, bacterial risk escalates fast. An inexpensive aquarium thermometer is an easy way to keep an eye on this.
Target a pH of 5.5–7.0 and keep TDS under 100 ppm. Basic pH strips or an inexpensive digital meter are sufficient — nothing fancy required.
For light, aim for bright indirect light (1,500–3,000 foot-candles) — a few feet back from a bright window, never on the windowsill in direct sun. Direct sun overheats the water, stresses the cutting, and fuels algae growth. Ambient humidity of 60–80% is ideal; keep cuttings away from heating vents and air conditioning units, which dry the air and cause water temperature to fluctuate.
Frequently Asked Questions About Brown Monstera Propagation Water
Why is the water brown for my Monstera cutting — is it dangerous?
Not automatically. Light amber, tea-colored water is a normal result of tannins and root secretions and won’t harm your cutting. The water only becomes a problem when it turns dark brown or black, develops a foul odor, or becomes slimy — all signs of bacterial growth or rot that need immediate attention.
Why does my Monstera cutting smell bad in water?
A sulfurous or rotten smell almost always means bacterial biofilm or decomposing tissue. Remove the cutting, inspect the stem for soft or mushy areas, clean the vessel with 3% hydrogen peroxide, and trim any dead root tissue before returning to fresh water. If the stem itself is rotting, cut back to healthy tissue first.
Should I use tap water or distilled water for Monstera propagation?
Distilled, reverse osmosis, or rainwater is genuinely better — lower dissolved solids, no chloramine, and a more stable starting pH. If tap water is your only option, test it with a TDS meter and aim for under 100 ppm. Letting it sit uncovered for 24 hours removes chlorine but not chloramine; a carbon-block filter handles both.
Why are my Monstera roots turning brown in water?
Some darkening of maturing roots is completely normal — older root tissue naturally shifts from white to tan to light brown as it matures. Warning signs are different: black coloration, a mushy or slimy texture, and an unpleasant smell all indicate rot rather than normal aging. Healthy roots, even brown ones, should feel firm to the touch.
Does activated charcoal actually help with Monstera water propagation?
Yes. Horticultural activated charcoal adsorbs tannins, phenolic compounds, and some bacterial metabolites, keeping water clearer for longer between changes. It’s not a substitute for regular water changes, but it’s a worthwhile addition. Keep 1–2 small pieces in the vessel at all times and replace them every few months. Use horticultural grade only — aquarium charcoal often contains additives unsuitable for plant propagation.