Quick Answer: Spots on spider plants are most commonly caused by fluoride or chlorine in tap water, overwatering, or pest damage — but fungal disease, bacterial infection, sunburn, cold drafts, and fertilizer burn are also culprits. Most causes are treatable once you identify the spot type. Use the table below to pinpoint your problem, then jump to the fix.
Quick Reference: What’s Causing Those Spots?
| Spot Appearance | Most Likely Cause |
|---|---|
| Brown, dry, papery tips and margins | Fluoride/chlorine toxicity |
| Yellow spots, mushy texture, foul smell | Overwatering / root rot |
| Circular spots, dark brown border | Fungal leaf spot |
| Water-soaked, translucent, angular spots | Bacterial leaf spot |
| Tiny silver or white stippling, webbing | Spider mites |
| Yellow spots, sticky residue, black coating | Scale or mealybugs |
| Bleached or silvery patches, upper leaf only | Sunburn |
| Sudden brown/black spots near a cold window | Cold damage |
| Brown crispy tips, white crust on soil | Fertilizer/salt burn |
How to Identify Spots on Your Spider Plant
Before you treat anything, you need to know what you’re dealing with. Take the plant somewhere with good light and work through these descriptions.
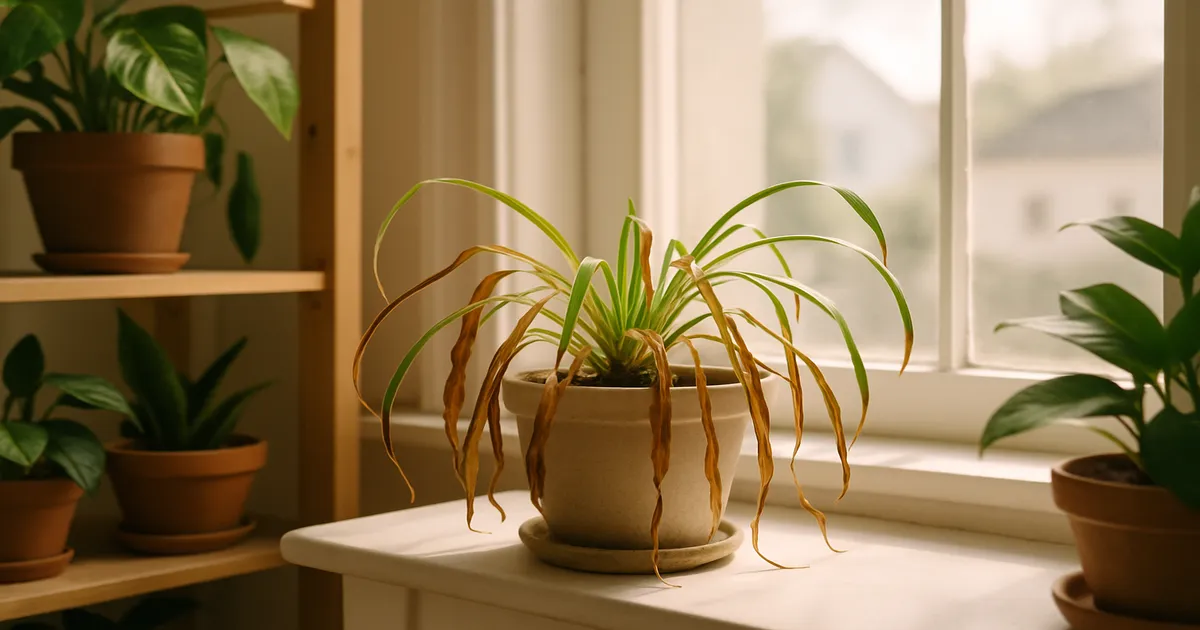
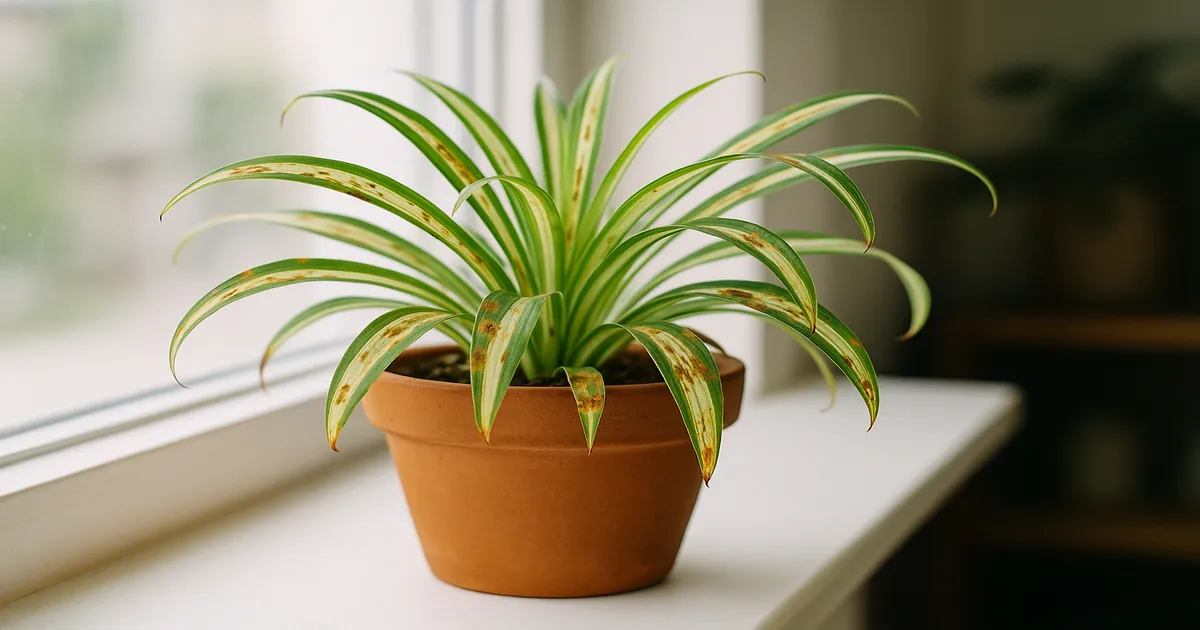
Brown, Dry, Papery Spots — Fluoride or Salt Burn
Damage starts at the leaf tips and creeps inward along the margins. The tissue is dry and crinkly — not mushy. Older leaves show it first, and you won’t find any pests on close inspection. ‘Variegatum’ cultivars tend to show this earlier than other varieties.
Yellow Spots with Mushy Texture — Overwatering or Root Rot
Soft, waterlogged patches — often with general yellowing of lower leaves — point strongly to overwatering. Tip the plant out of its pot. Brown, slimy, foul-smelling roots confirm root rot has set in.
Circular Spots with Dark Borders — Fungal Leaf Spot
Look for round spots 1–5 mm across, with tan or grey centres and darker purple-brown borders. Alternaria infections often show concentric rings — like a tiny bullseye. ‘Bonnie’ (the curly-leafed variety) is especially prone because its wavy leaves trap moisture and restrict airflow.
Water-Soaked, Translucent Spots — Bacterial Infection
Hold the spotted leaf up to a bright light. Bacterial spots appear translucent or greasy in early stages — almost like a wet patch on paper. They tend to sit along leaf veins, giving lesions an angular rather than circular shape. A yellow halo frequently surrounds the spot.
Tiny Silver or White Stippling — Spider Mite Damage
Hundreds of tiny pale dots across the upper leaf surface give the whole leaf a dull, silvery cast. Flip the leaf over and look closely — fine webbing or tiny moving specks confirm mites. Adults are only 0.3–0.5 mm, so a 10× hand lens helps enormously.
Bleached or Silvery Patches on Upper Leaves — Sunburn
Sunburn appears exclusively on the upper leaf surface, in irregular patches wherever direct sun hit the leaf. The tissue is dry and pale — almost white — with a sharp contrast against healthy green tissue alongside it.
Sudden Brown or Black Spots Near Windows — Cold Damage
If spots appeared overnight, especially on leaves touching a cold windowpane or sitting in a draft from an AC vent, cold damage is the likely culprit. Early cold spots look water-soaked; within a day or two they turn brown or black.
The 9 Most Common Causes of Spots on Spider Plants
1. Fluoride and Chlorine Toxicity (Most Common)
Municipal tap water in the US contains fluoride at 0.7–1.0 ppm — added intentionally for dental health, but genuinely harmful to spider plants over time. Fluoride travels through the plant via the transpiration stream and accumulates in leaf tips, where it disrupts chloroplast membranes and inhibits the enzyme enolase, killing cells. Chlorine causes similar oxidative stress. The damage is permanent — those brown spots will not turn green again.
Key diagnostic clue: Damage starts at the tips of older leaves and works inward. No pests, no smell, no mushiness.
2. Overwatering and Root Rot
Consistently wet soil drives out oxygen and creates ideal conditions for Pythium, Fusarium, and Rhizoctonia — soil-borne pathogens that rot roots first, then cut off water and nutrient flow to the leaves. The plant essentially starves despite sitting in wet soil. Ethylene gas produced by waterlogged roots accelerates the decline further.
Key diagnostic clue: Pull the plant out. Brown, soft, foul-smelling roots confirm root rot.
3. Fungal Leaf Spot (Cercospora and Alternaria)
Cercospora fungi produce a toxin called cercosporin that generates cell-destroying reactive oxygen species when exposed to light — essentially turning the plant’s own light against it. Alternaria species degrade cell walls with mycotoxins. Both thrive when temperatures sit between 77–86°F and humidity stays above 85% for extended periods. Spores travel by water splash, so overhead watering accelerates spread.
4. Bacterial Leaf Spot (Pseudomonas and Xanthomonas)
Pseudomonas cichorii and Xanthomonas spp. enter through natural leaf pores called hydathodes, or through wounds. Once inside, they produce enzymes that dissolve cell walls rapidly — bacterial populations can double every 20–30 minutes in warm, humid conditions. Overhead watering is the primary way these bacteria spread from plant to plant.
5. Spider Mite Infestation
Two-spotted spider mites (Tetranychus urticae) pierce individual leaf cells with needle-like mouthparts and drain the contents, leaving behind collapsed, air-filled cells that appear as pale stippling. A single female lays 100–200 eggs over her lifespan. Populations explode in low humidity (below 40%) and warm temperatures — exactly the conditions in a centrally heated home in winter.
6. Scale Insects and Mealybugs
Soft brown scale (Coccus hesperidum) and mealybugs (Pseudococcus spp.) tap directly into phloem tissue, draining the plant’s sugary sap. They excrete sticky honeydew, which coats the leaves and feeds sooty mold fungi — a black coating that further blocks photosynthesis. Yellow spots at feeding sites are often the first visible symptom.
7. Sunburn and Photoinhibition
Spider plants evolved under the dappled light of African forest floors. When exposed to direct sun exceeding roughly 3,000–5,000 foot-candles, the photosynthetic system is overwhelmed. Excess light energy converts to singlet oxygen and other reactive molecules that bleach chlorophyll and destroy thylakoid membranes — a process called photoinhibition. Severe cases cause permanent bleaching.
8. Cold Damage and Drafts
Below 50°F (10°C), this tropical plant suffers chilling injury — membranes lose fluidity, enzymes stop working, and electrolytes leak out of cells. Below freezing, ice crystals physically rupture cell walls. Cold air from a drafty window or AC vent can affect just a few leaves, producing spots that seem to appear from nowhere overnight.
9. Fertilizer Burn and Salt Accumulation
Over-fertilizing raises the electrical conductivity (EC) of the soil solution. When salt concentrations outside root cells exceed those inside, water is pulled out of the roots by osmosis — the plant wilts and burns even in moist soil. Damage appears first at leaf tips and margins, and you’ll often see white crusty deposits on the soil surface or pot rim.
Step-by-Step Fixes for Each Type of Spot on Your Spider Plant
Fixing Fluoride and Chlorine Toxicity
- Switch your water source. Use distilled water, collected rainwater, or reverse osmosis (RO) filtered water. A countertop RO system such as the APEC Water Systems ROES-50 pays for itself quickly if you have multiple houseplants.
- Don’t rely on letting tap water sit. Leaving tap water out for 24–48 hours off-gases chlorine but does not remove fluoride or chloramine.
- Check your soil pH. Maintain 6.0–6.5 — lower pH increases fluoride solubility and uptake. Use dolomitic limestone to raise pH if needed.
- Trim damaged leaves with sterile scissors. The spots are permanent; removing them keeps the plant tidy and redirects energy to healthy growth.
- Avoid superphosphate fertilizers, which are naturally high in fluoride. Choose bone meal or rock phosphate alternatives instead.
Treating Overwatering and Root Rot
- Unpot the plant immediately and shake off all old soil.
- Trim every brown, mushy root with sterile pruning shears. Healthy roots are white or light tan and firm to the touch.
- Dust cut ends with powdered cinnamon or sulfur as a natural antifungal.
- Repot in a fresh, fast-draining mix: 50% quality potting mix, 30% perlite, 20% coarse sand. Fox Farm Ocean Forest is a reliable base mix for this.
- Apply a biological fungicide drench containing Trichoderma harzianum or Bacillus subtilis to suppress remaining pathogens.
- Wait until the top 2 inches of soil are dry before watering again — a soil moisture meter takes the guesswork out completely.
Treating Fungal Leaf Spot
- Remove and bin all spotted leaves — do not compost them.
- Water at soil level only — keep foliage dry at all times.
- Apply a copper-based fungicide (copper octanoate or copper hydroxide) every 7–10 days for 3–4 applications.
- Supplement with neem oil at a 2% solution between copper treatments; apply in the evening to prevent leaf burn.
- Space plants 6–12 inches apart and run a small fan on low to improve airflow around the foliage.
Treating Bacterial Leaf Spot
- Isolate the plant immediately to prevent spread to other houseplants.
- Remove all affected leaves using scissors sterilized with 70% isopropyl alcohol between every cut.
- Apply a copper-based bactericide (copper sulfate or copper hydroxide) every 7 days for 3–4 weeks.
- Stop all overhead watering and misting for the duration of treatment — and ideally permanently.
- If more than half the leaves are affected, consider propagating healthy spiderettes and discarding the mother plant (see below).
Eliminating Spider Mites
- Raise humidity above 50% immediately — mites struggle to reproduce in humid air. A cool-mist humidifier such as the Levoit Classic 300S is effective for a small plant collection.
- Blast the plant with water in a shower or sink, hitting both leaf surfaces, to physically dislodge mites and eggs.
- Spray insecticidal soap (2% potassium fatty acid solution) on both leaf surfaces every 5–7 days for 3–4 rounds.
- Follow up with neem oil (1–2% solution with a drop of dish soap as emulsifier) between soap applications.
- For severe infestations, predatory mites (Phytoseiulus persimilis) are highly effective and completely chemical-free.
Removing Scale Insects and Mealybugs
- Manually remove visible insects with a cotton swab dipped in 70% isopropyl alcohol.
- Spray insecticidal soap over all plant surfaces, paying close attention to stem bases and leaf axils; repeat every 5–7 days for 4–6 weeks.
- Apply neem oil as both a foliar spray and a soil drench — systemic uptake can deter phloem-feeders from within.
- Inspect weekly for newly hatched crawlers, which are nearly invisible but highly vulnerable to treatment.
Recovering from Sunburn
- Move the plant immediately into bright indirect light (1,500–3,000 foot-candles) — near a north- or east-facing window works well.
- Trim bleached leaves if they are mostly damaged; they will not recover colour.
- Hold off on fertilizing until new healthy growth appears.
The bleached patches are permanent, but the plant will push out new, healthy leaves once it is back in appropriate light.
Repairing Cold Damage
- Move the plant away from cold windows, drafty doorways, and AC vents right away.
- Keep temperatures above 60°F (15°C) consistently — 65–75°F is ideal.
- Remove blackened or collapsed leaves — they will not recover.
- Ease off watering for one to two weeks; cold-damaged roots are less efficient, and overwatering compounds the stress.
Correcting Fertilizer Burn
- Flush the soil thoroughly — take the pot to a sink and run water through it for 2–3 minutes, allowing it to drain fully. Repeat twice. This leaches accumulated salts.
- Scrape off any white crust from the soil surface before flushing.
- Switch to half-strength fertilizer going forward, applied no more than once a month during active growth (spring through early autumn). A balanced water-soluble formula such as Jack’s Classic All Purpose 20-20-20 at half the recommended dose is a safe choice.
- Trim burnt leaf tips with clean scissors — they will not green up, but the plant will grow new, healthy leaves.
How to Prevent Spots on Spider Plants Long-Term
Water Quality
The single most impactful change most owners can make is switching away from tap water. Distilled, rainwater, or RO-filtered water eliminates fluoride toxicity entirely. If you must use tap water, let it sit overnight to off-gas chlorine — but know that fluoride remains regardless.
Watering Technique
Allow the top 1–2 inches of soil to dry out before watering — roughly every 7–10 days during active growth, less in winter. Always water at soil level, never overhead, to keep foliage dry and reduce fungal and bacterial risk.
Light and Temperature
Spider plants want bright indirect light near a north- or east-facing window, or a few feet back from a south or west window. Keep temperatures between 60–80°F and away from any draft below 50°F. Cold windowpanes in winter are a surprisingly common source of cold damage; move plants at least a foot back from the glass.
Humidity and Air Circulation
Aim for 40–60% relative humidity. Below 30%, spider mite risk skyrockets and tip burn worsens. A pebble tray or grouping plants together helps. Avoid misting — it wets foliage without meaningfully raising ambient humidity and actively encourages fungal and bacterial disease. Space plants 6–12 inches apart and consider a small fan on its lowest setting to reduce the humid microclimates at leaf surfaces where fungal spores germinate.
Fertilizing
Feed at half the recommended strength, once a month during spring and summer, and not at all in winter. Avoid superphosphate fertilizers, which are high in fluoride. Maintain soil pH between 6.0–6.5 to minimise fluoride uptake and support healthy nutrient availability.
Spider Plant Varieties and Spot Susceptibility
‘Vittatum’ (white central stripe, green margins) is the most widely sold variety. Its vigorous growth rate means it transpires heavily, which accelerates fluoride accumulation in leaf tips — making it the variety most commonly associated with tip burn.
‘Variegatum’ (green centre, cream-white margins) is slightly more sensitive to fluoride than ‘Vittatum’. The wider white margins contain less chlorophyll and are more vulnerable to cellular damage. If you own this variety, switching to distilled or RO water is especially worthwhile.
‘Bonnie’ has curly, wavy leaves that trap moisture between leaf surfaces and restrict airflow, making it more susceptible to Cercospora and Alternaria fungal leaf spot than flat-leafed varieties. Extra attention to air circulation pays off here.
‘Ocean’ has narrower leaves with white margins and is generally considered the most resilient of the common cultivars — but it still develops the same fluoride sensitivity, spider mite issues, and overwatering problems as the others, just perhaps a little more slowly.
When to Propagate Instead of Treating
If more than 60–70% of leaves are affected by bacterial leaf spot, or if root rot has destroyed most of the root system, treatment becomes a losing battle. The practical response is to propagate the healthy spiderettes — the small plantlets dangling on long stolons — and start fresh.
Choose pups that are firm, fully green, and free of any spots. Place them in a small jar of distilled or RO water until roots reach 1–2 cm, then pot them into a fresh, well-draining mix. Keep the new plants in bright indirect light and resist the urge to fertilize for the first four to six weeks while roots establish.
Frequently Asked Questions About Spots on Spider Plants
Why does my spider plant have brown spots even though I water it correctly? The most likely culprit is tap water, not watering frequency. Fluoride and chloramine in municipal water accumulate in leaf tips over time regardless of how carefully you water. Switch to distilled or rainwater and the problem stops progressing, though existing spots are permanent.
Can I cut off the spotted leaves? Yes — and you should. Removing spotted leaves with sterile scissors tidies the plant, removes a potential source of fungal or bacterial spores, and redirects the plant’s energy to healthy growth. Always sterilize your scissors between cuts if disease is suspected.
Will the brown or yellow spots on my spider plant spread to other plants? It depends on the cause. Fluoride toxicity, sunburn, cold damage, and fertilizer burn are not contagious. Fungal leaf spot, bacterial leaf spot, spider mites, scale, and mealybugs can spread — isolate the plant immediately if you suspect any of these.
How do I know if my spider plant has root rot or just needs water? Lift the pot — a pot with dry soil feels noticeably lighter than one with wet soil. If it feels heavy but the leaves are yellowing and soft, unpot the plant and check the roots. Healthy roots are white and firm; rotted roots are brown, slimy, and smell sour.
My spider plant has spots but I can’t find any pests — what’s wrong? If the spots are dry and brown at the tips, fluoride toxicity is the most likely cause. If they are yellow and soft, overwatering is more probable. Pests are not always the answer — in fact, water quality and watering habits cause the majority of spider plant spotting problems.